
Since I switched back to blogger I created some issues with the photo’s that I had uploaded when on wordpress. I’m manually re-uploading those images as fast as I can – thanks for your patience! The good news is – I have all the photo’s back on the tutorials for the 52 Twisted Tradition Block Quilt Along – you can go back and work on all of them as you wish. I’m going to work backwards on getting the rest of the blog fixed but I’m pretty sure it will take me quite awhile. If there’s a post you really can’t wait to see the pictures on – just let me know and I’ll get to that one right away.
So – now that mess is fixed and let’s move on to the next block. I’m really excited about this one and just love how fun it is!
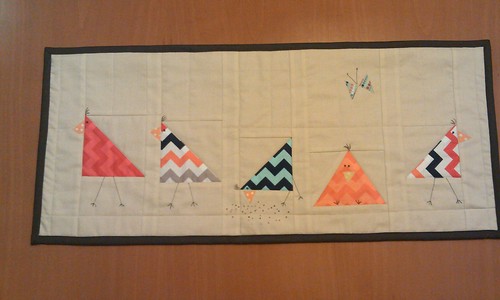
I was 100% inspired by a fellow Project QUILTER’s piece, “An Unruly Flock” by Adva P for this block. In this case the inspiration led me to find the block to twist. I used this inspiration and hunted for a block to fit it too…The triangles in the shoofly were perfect!
So…let’s see how I made (and you can make) the traditional block into the twisted ‘Shoofly Chicken’ block.
Shoofly Chickens Block Tutorial for 52 Twisted Traditional Block Quilt Along
Finished Block Size – 12” x 12”
I twisted the traditional block “Shoofly” for our next block. I twisted this in a few ways to create the look below.
Cutting Instructions

Yellow
2 – 4” squares
1 – 3.5” squares
Blue
2 – 4” squares
4 – 3.5” squares
2 – 4.5” x 2.5” strips
Orange
Approximate 2.5” square scrap
Green
2 – 2” x 9.5” strips
2 – 2” x 12.5” strips

Approximate 2.5” fusible Heat N Bond (or whatever brand you prefer)
Other Tools
Black Micron Pen OR
Needle and Thread for embroidery work
Directions
We’re going to start with the center square. In a traditional Shoofly block, the center square is just one piece of fabric. We’re going to ‘twist’ ours to add another design element to the block.

Take your 3.5” square and iron it in half so you can see the crease of the center.

Using a water soluble fabric marker, mark the spot of the crease.

Draw a line from both corners to the center mark to create a triangle.

Lay one strip of blue fabric right sides together with the yellow square, overlapping the triangle you just drew by approximately ¼”.

Sew along that line.

Trim 1/4” off the seam.

Iron toward the blue strip of fabric.

Lay the second strip, right sides together, with approximately ¼” overlapping, as I show in the picture above.

Sew along the line you drew.

Trim 1/4” off the seam.

Iron towards the strip.

Now – we need to trim our piece back down to 3.5”. Line up your ruler so the yellow fabric fits in the 3.5” and trim two sides.
 Rotate and trim the third side.

Now – here is your middle 3.5” ‘twisted’ square for your ‘Shoofly Chickens’ block.
The second element in the shoofly block we will make are the four half square triangle (HST) corner blocks.

Draw a water soluble line from one corner to the other on the wrong side of your yellow fabric. Place the yellow and blue fabrics right sides together.

Stitch a ¼” on both sides of the line you drew.

Cut along the line. Iron towards the yellow.


Square up the HST blocks to 3.5”. Repeat with the other pair of yellow and blue squares.

Layout the nine 3.5” blocks in the traditional Shoofly block layout.

The traditional layout wasn’t quite what I would like for my chickens so I twisted it just a bit by twisting the two bottom corner blocks.

I liked this layout so I sewed the nine blocks together.

The shoofly block needs a border to make the chickens work…so sew the two 9.5” x 2” strips to the two edges and then add the two 12.5” x 2” strips to the top and bottom.

Our block is together…time to embellish!

Draw a few triangles on your fusible scrap.

Cut them out and lay them on the chickens to check if you like the size.

If they’re too small…feel free to cut a bigger triangle – you can see I did here.

You will need five triangles for the beaks. Pull off the fusible paper and iron them in the location you want – Chickens can be standing up or pecking the ground. The middle chicken will be sitting on its butt.

Now it’s time to get out your trusty Micron pen for the final touches. (or a second option would be to embroider the lines I’m going to draw using Melissa’s embroidery tutorial).

My middle chicken is sitting on its butt so I drew on two eyes, two feet, and hair feathers.
 The pecking chickens need an eye, two legs and some hair feathers.

The standing chickens needed an eye, two legs and some hair feathers.

And there you have it – the Shoofly Chicken Block!

Here’s another block I made with a few other fabrics.
Thanks for following along and I hope you enjoyed this block tutorial!
Get your FREE printable PDF of this block by heading to my craftsy store. Don’t wait too long…after a month(6/7), the PDF will be $1.

I can’t wait to see what all your blocks look like! Be sure to share you blocks and any projects you make using your blocks onto our flickr group: 52 Blocks Quilt Along
Instagram/Twitter Hashtag: #52bTT
Previous Blocks
Stop back next Wednesday for another twisted traditional block tutorial!
Leave a Reply