 The first off season challenge, It’s All in Your Initials, is concluded and we had six fantastic entries. Since there is no official voting or judging this post is just to show off the great work the quilters did.
Quilter: UniquelyNancy
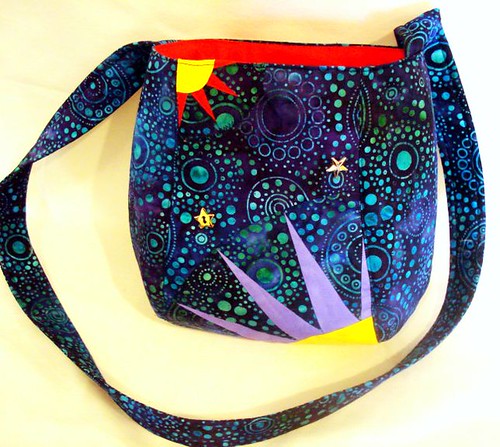
Starry Starry Night Shoulder Bag
I am from Warren Ct. and I have a hard time coming up with ideas for these challenges. This one came to me in a dream after looking at the colors I found to fit my initials, my initials being N.V.S.T.
I chose Navy, violet,Siren red and topaz yellow. The navy print looks like a night sky so I chose that for the background and then used the remaining colors to make three New York Beauty blocks which I cut as the front and back panels for my bag. Then I dug through my many button boxes and found some metallic stars to add for more interest. The bright red lining and the large interior pocket were then added and voila!
Quilter: Marcia’s Crafty Sewing and Quilting
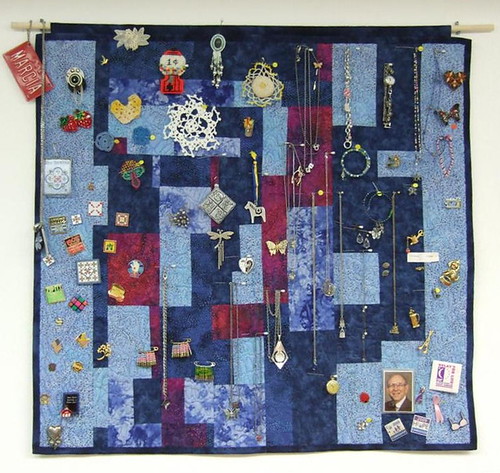
“Marcia’s Tiny Treasures Quilt”
It’s all in your Initials – Project Quilting Marcia Wachuta Boscobel, Wisconsin
Marcia’s Crafty Sewing and Quilting Midnight Blue, Evening Blue and Wild Watermelon were my colors for MEW. I chose colors from the Crayola Crayon website. Using a variation of my Scattered Quilt Pattern, I constructed a small quilt. I quilted it with my name all over the quilt in a wavy design. You can see a video of the quilting at Work in Progress – The Quilting. The quilted wall hanging measures 30″ X 32″. I attached the binding with an all machine embroidery binding and added a hanging sleeve on the top. I hung it on the wall behind my quilting machine, where I then added all my tiny treasures….. Pins from quilting events and pins from when I was a teacher. Pins from Relay for Life including a photo of my Dad who died of cancer in 1996. My Mom is currently battling cancer. I pinned up my tiny crocheted items that I made years ago. Then I added charms, pins, and necklaces from four generations of my family. They all have special meanings. As I was going thru’ my treasures, I found the little beaded pins from the 90’s! Can you see the American Flag and the Packer G? I decided to group the items, but I certainly could have just put them up in any order. What a delightful quilt project! The perfect spot for all the little memorabilia from the past. As I find more items, I will proudly display them on my quilted wall hanging.
Quilter: ForQuiltsSake
Celebrate Your Differences
Made by Pam Geisel of For Quilts Sake in Yellow Springs, Ohio, May 2011 for Project Quilting Off Season (Spring 2011), Challenge 1, It’s All In Your Initials 17” x 17” My creative process and how I made it: My initials are PKG so I used Purple, Green and Black. The purple and the green should be obvious, but why did I use black? My background is in graphic design and when designing something that will be printed in full-color, we use the color system CMYK which stands for cyan, magenta, yellow and black. I can only assume they used “K” for black because using “B” would make people think blue. So black really was the first color I thought of to use with my “K”. I thought it would be fun to use some of the fabrics that I won from Project Quilting last season. One of my prizes was a set of Hoffman Bali Batik bundles. I got the Grasshopper collection which conveniently was mostly greens, blues and purples. I picked out some of the greens and purples and then added some green hand dyed fabric that I also won. I came up with a design that used fabric in 2.5” strips since that’s how wide the batiks were. I decided to use the black fabric as squares going from one corner to the other diagonally, but I wanted to add something special to them so to be different, one of the diagonal squares is a green/purple batik instead of the black. I knew I wanted to keep the connection so I planned on outlining that square with black. My original quilting idea was much different than I ended up using. Once everything was pieced, I got out my threads and while I did have several greens threads, I only had one spool of purple and it was variegated. I like using variegated thread but with a small project that will be quilted with a straight stitch, it’s hard to see the colors change. And I didn’t have a variegated green so I thought that might look a little odd for one to be variegated and the other not. I then thought I might do some seed stitching with needlework floss but found that I didn’t have much green and didn’t seem to have any purple. Where has all my purple gone? Back to idea number one but instead of stitch-in-the-ditch or some random curves going from one side to the other, I thought it might be nice to sew a quarter inch from the seam and use purple thread on the green pieces and green thread on the purple pieces, so I took the black thread off the sewing machine and started to put on the purple when I noticed how well the black thread showed up against the fabrics and I quickly threaded the black back into the machine and did the quilting. I used my favorite facing technique for the binding and then got out my large supply of beads and yarns and ribbons to decide how I wanted to embellish this quilt. None of the yarn or ribbons felt right so on to the beads. I did have several green and purple beads but most of them got lost in the colors. I just couldn’t decide how to use the green and purple beads so I stared sewing some black seed beads around the special square to outline it. And since the beads were sitting out on the quilt waiting to be sewn, I noticed some had rolled onto the black quilting lines. I really liked how they looked placed at random intervals, they were small so they didn’t overpower the piece, but they were large enough to be noticed.
Quilter: KimsCraftyApple
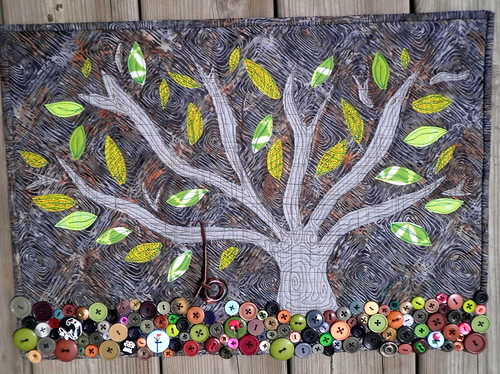
The Tree
My colors for this challenge were:
(K)ohl
(A)sh
(L)ime I decided to try out a few different appliqué techniques – reverse and raw edge. I layered my lighter gray fabric (ash) below the darker gray fabric (kohl) and basted them together. I then took my tree template and sewed along the edge of it. Using my sewing lines I carefully cut the kohl fabric off in the pattern of the tree. Once this was done I realized I wanted a few more little branches off the sides and I added those as well. For the leaves I used different lime fabrics and fused them onto the fabric. Once all pieces of the tree were complete I had some fun free motion quilting it. Once this was done I realized it needed more. I loved that the rules of the challenge allowed us to use other colors to embellish. I knew right away that I had to add a tire swing. My girls have had HOURS of fun on Grandma and Grandpa’s so it is definitely a must. The next thing I decided to add was a button lawn. I know I could have used my machine to stitch these down but I decided to do it by hand – it kept me busy and my mind off the fact that my new baby was content in my belly. Approximate Dimensions: 14″ x 20″ Created by Kim Lapacek
Madison, WI
Quilter: AllThingsBelle
“Garden Party”
This is my entry for Project Quilting’s Off Season #1. Our challenge was to create a quilted piece with color names from our initials. I’m Jennifer Jacqueline Rodriguez.
J – Jalapeño
J – Java
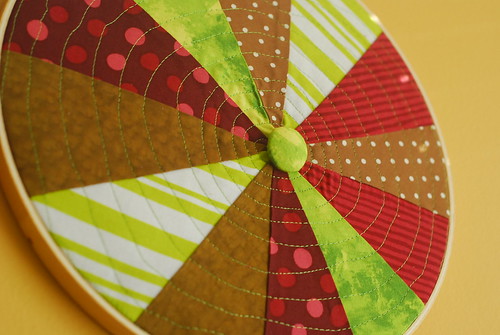
R – Raspberry For this project, I wanted to work on piecing. I had been eying the Sprocket pillow tutorial and thought it would be a great starting point. I had never pieced a circle before this. It was not super easy, but I’m pretty happy with the end result. When I worked on this, I had just finished a different pillow and I wasn’t really in the mood to make another. I thought this quilt top would be fabulous as modern expression as a flower. I made a matching fabric covered button for the flower center. I’m not huge on everything be symmetrical, so when I hooped it askew – I think it helps it look more flower-ish as well.
Quilter: Diane Lapacek
Pansy Fury
My initials are DML. I considered many color combos, but finally decided on daffodil, mango, lime. Wild!!! Not my usual range, but, hey, a challenge isn’t supposed to be easy. I first thought of doing some kind of a bargello, then cutting it up and putting it back together to create a more interesting effect. That swam around in my head a bit then I thought, “Why not do it in a circle.” So that’s what I did. I flipped a few pieces to add interest, then cut the edges in curves instead of a circle because I thought it had the look of a pansy. I added an extra layer of mango in random spots, then went looking for a piece of lime green to appliqué it to. I couldn’t find anything in my stash that suited me, so I dyed up a few pieces. I learned that it takes ALOT of yellow and a little blue to make a really great lime green. I covered the raw edges of the appliqué with rickrack, DMC floss and other hand dyed and commercial fibers. I stitched the ends down, then twisted them all together and stitched them with a straight stitch. This allowed them to stay loose enough to give a 3D effect. Because these were embellishments, I added some gold and brown tones. I used two different combinations of fibers. I added the squares and rectangles in the corner because I liked the contrast with the curves of the “pansy”. Satin stitching added an additional design element. I added some mango bias tape to create a border effect. I quilted the mango portion of the “flower’ in lines from the center outward and the daffodil portion going around the circle. The background is a freehand fern effect and the “border” has a small pebble pattern. I left the squares and rectangles un-quilted. The flower center was created by using “shreds” of hand dyed fabrics. Whenever I square up a piece of hand dyed fabric, I throw the “shreds” into a box. I took a few at a time and wrapped them around my fingers, then laid them flat and stitched through the center to tack them down. I fluffed them up and trimmed the wildest ends to create 3D loops that add great dimension. A lime stripe cut on the bias was used for the binding. This is my first challenge. Up to now I’ve been a judge. I have always been amazed by the things the Project Quilting participants create in just one week. After completing this, my respect for all of you has only gone up. This is not easy. But it does feel great to finish a project I would never have envisioned without this challenge. And it was FUN. And I know it will make me a better quilter. 26″ x 30″. Created by Diane Lapacek in Poynette, WI. A new challenge will be posted this coming weekend – Stay TUNED! Also, if any participants from Season 2 want to fill out their interviews and return them to me so I can post them I would LOVE it! Here is a look back at the one’s I’ve posted so far:


And once again they are all great!
Kim and Barb thanks so much for inspiring quilting creativity!
They are wonderful! And Kim, how in the world did you find time to sew that up?? Good grief you put me to shame!
What wonderful projects, I like them all for different reasons. (And I think I spy some fabrics from my shop in a couple of them, which is neat). I really want to vote for at least three.
The challenge rules were fun too.